Projects and Rules
At the heart of Assemblic is the Project. A project is a wrapper around a complete “Rules as Code” system, powered by OpenFisca and backed by a private Git repository.
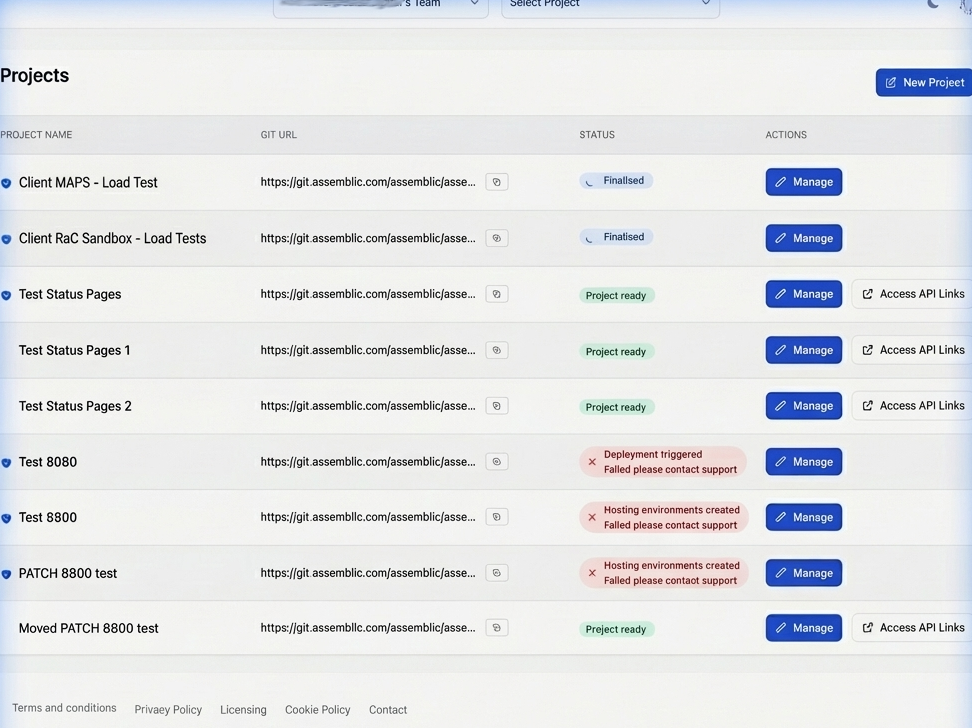
Navigating Projects
The Projects page displays all your work in a detailed table format.
- Search and Filter: You can search for projects by name or ID, and filter the list by current status (e.g.,
Project ready,Archived). - Tabs: Toggle between Active Projects and Archived Projects.
- Manage: Click the Manage button (pen icon) on any project row to open the detailed project settings pane.
Project Privacy and Protection
All projects are protected by an API Key by default. You can toggle this Protected status from the project settings pane. API Keys used for integration are managed via the Access Tokens section.
Creating a Project
Go to the Projects section in your dashboard.
Select your desired Team from the Team Context dropdown menu at the top of the interface.
IMPORTANT
Subscription Required: You must have an active subscription to create new projects. If your plan is inactive or if your team has reached its project limit, this feature will be disabled.
Click New Project.
Enter a name and description, then confirm.
Assemblic will immediately begin provisioning a new OpenFisca instance and a private Git repository for you.
Project Status Lifecycle
You will see the project pass through several statuses in the table:
- Git repository created: The private repo is established.
- Git repo initialised: The
openfisca-templatehas been successfully copied into the repository. - Project ready: The OpenFisca environments have been successfully provisioned and are ready to receive code.
NOTE
Wait for the status to show Project ready before attempting to deploy code or query your project via the API.
Environments and Branches
Assemblic uses a robust, Git-backed strategy for deployment. Every project comes with three distinct hosted environments, each mapped automatically to a specific Git branch:
mainbranch -> Deploys to the Production environment.stagebranch -> Deploys to the Staging environment.developbranch -> Deploys to the Development environment.
Pushing changes to any of these branches automatically triggers a new deployment to the corresponding hosted environment.
Managing Environment Versions
You have full control over the execution environment for your rules. You can configure the OpenFisca Core version, base image variants, and Country Templates on a per-branch basis.
- Click the Expand icon (caret) on the far left of a project row to reveal the environments.
- Click Manage Env next to the specific environment branch (e.g.,
Production). - In the side pane, you can select the supported OpenFisca Core version, Base image variant (choose
minimalfor speed, ornumericif you require scientific libraries like pandas/numpy), and the Country template version. - Click Save.
This gives you strong security assurance by allowing you to manually verify and pin the OpenFisca core version deployed to your live environments.
The Rules Editor
Assemblic includes a full-featured, Monaco-powered web Code Editor for writing and managing your Python rules directly in the browser.
To access it, select the project you wish to edit from the context dropdown menu at the top of the screen, then click Rules Management in the sidebar.
Code Editor Features
- File Explorer: Navigate your project structure. Click any file to open it in a new tab.
- Code Editor: A syntax-highlighted editor tailored for Python and YAML.
- Saving: Use standard keyboard shortcuts (
Cmd/Ctrl + S) to save your current file. - Closing: Use
Cmd/Ctrl + Wto close the active tab, or click thexon the tab. Unsaved changes are marked with a yellow dot on the tab.
- Saving: Use standard keyboard shortcuts (
- Git Integration: The Code Editor includes built-in source control. You can stage your saved files, enter a commit message, and push directly to your branches from the UI.
Local Development
If you prefer using your own local tooling (like VS Code or PyCharm), you can easily develop locally. Every project is a standard Git repository.
1. Get the Git URL Click the Copy icon next to the Git URL in the project list or in the project settings pane. This copies the full URL with your authentication token already included. 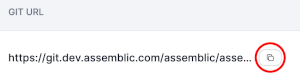
2. Credentials If you need manual credentials (username/password), you can find them in your Profile > Settings.
3. Clone the repository
git clone <your-authenticated-git-url>4. Project Structure Your local repository will contain your project code. Place your rule code inside the openfisca_rules/ folder. While the repository contains a Dockerfile for your own local testing, hosted Assemblic builds ignore this Dockerfile and instead rely on the secure, hardened infrastructure managed by Assemblic (configured via .assemblic/version.yaml).
5. Push to deploy Push your commits to the main, stage, or develop branches to trigger an automatic deployment to the respective environment.
Hosted builds and security
Hosted deployments use pre-built base container images maintained by Assemblic (published to ghcr.io/assemblic/, for example openfisca-base-minimal or openfisca-base-numeric). The tag is derived from the OpenFisca Core version, country template, and base variant you select in the UI or set in .assemblic/version.yaml. Your rules run on top of that image — not on an ad hoc image defined only by your repository’s Dockerfile.
What actually gets built when you deploy
For hosted environments, Assemblic uses a controlled build recipe (not your repo Dockerfile). The image is produced by layering only:
- your
openfisca_rules/tree (after automated checks), and - a sanitised
requirements.txt(dependencies are filtered against an allowlist),
onto the selected pre-built OpenFisca base. The build context is deliberately minimal so supply-chain and runtime behaviour stay predictable.
IMPORTANT
If deployment fails with Docker or CI errors, check the job log first. Failures you might assume are “infrastructure” are often policy checks on your rules or dependencies (see below).
Checks that can block a deployment
These run as part of the hosted pipeline and can fail the build before an image is promoted:
- Dependency allowlisting — Packages in
requirements.txtmust be permitted. Unsupported or unknown packages may be removed or cause the job to fail. - Rules static analysis (application control) — Every
*.pyfile underopenfisca_rules/is scanned for imports and call patterns we treat as unsafe for a hosted rules engine (aligned with strong application-control practice). A typical failure looks like:Dangerous imports or patterns detected:
followed bypath/to/file.py:line: ….
Imports and patterns we reject in openfisca_rules/
Do not rely on the full Python standard library or arbitrary third-party networking inside openfisca_rules/. In particular, importing any of the following modules will fail the check (the authoritative list may evolve; the log always names the offending line):
ctypes, importlib, marshal, multiprocessing, os, pickle, requests, runpy, shelve, socket, subprocess, sys, and modules in the code / codeop families.
Explicit allowances
urllibandurllib.request— allowed if you need HTTP from the standard library.os.pathonly — you may useimport os.pathorfrom os.path import ….import osandfrom os import …are not allowed, even if you only wanted path helpers. Preferpathlib.Pathand__file__for resolving paths next to your rules.
Calls we reject
Even where imports were tightened, the scanner flags dangerous execution patterns, including os.system, os.popen, and any subprocess.* call. Hosted rule code must not spawn shells or child processes.
Practical guidance
- Join or resolve filesystem paths — Use
pathlib.Path; avoid importing theospackage (import os/from os import …). - Fetch URLs — Use
urllib.request, notrequests. - Run shell commands or external programs — Not supported from
openfisca_rules/on hosted builds; keep logic inside OpenFisca-safe Python.
After a failure, open the file and line cited in the log, remove or replace the flagged import or call, commit, and push again.
Archiving and Deletion
At the bottom of the project settings pane is the Danger Zone, where you can manage the end-of-life for your project.
- Archive Project: Archiving a project deletes its hosted applications and endpoints, but safely preserves the Git repository in a read-only state. You can view and restore archived projects from the Archived Projects tab above the main project list. Crucially, archived projects do not count towards your active project subscription quota.
- Delete Project: Deleting a project permanently obliterates all associated data, repositories, and applications. This action is completely irreversible. Assemblic respects the user’s right to be forgotten.